


Your most valuable business tools, trucks, machinery, and laptops do more than keep daily operations running. When tracked correctly, these fixed assets quietly fuel growth by sharpening financial accuracy, streamlining tax planning, and revealing true cost of ownership.
Yet many QuickBooks users still rely on spreadsheets or ad-hoc notes, risking missed depreciation, compliance headaches, and skewed financial records. Mastering fixed asset management inside QuickBooks eliminates that guesswork. By setting up each asset once and letting the software handle depreciation schedules, journal entries, and disposal calculations, you gain real-time insight for strategic decisions.
Understanding Fixed Assets and Their Role in QuickBooks
Fixed assets are long-term resources your company uses to generate revenue. They appear on the balance sheet, depreciate over time, and—when managed correctly—help you ensure accurate financial reports and confident tax planning.
Defining Fixed Assets: Key Characteristics and Examples
Before you build an asset item list, clarify what belongs there. In QuickBooks, an asset usually fits these criteria:
- You expect to use it for more than a year.
- It carries a significant purchase price acquisition—often governed by your internal capitalization policy.
- It contributes to day-to-day operations rather than being held for resale.
- It is subject to wear, obsolescence, or depletion, making depreciation schedules essential.
Common fixed asset types QuickBooks users track include:
- Vehicles and heavy equipment
- Manufacturing or medical machinery
- Computer and office equipment (servers, laptops, printers)
- Furniture and fixtures
- Leasehold improvements and buildings
Recording each of these properly ensures financial records reflect true book value and replacement costs, supporting better budgeting and growth projections.
Why Fixed Asset Management Matters for QuickBooks Users
Neglecting structured tracking leads to costly blind spots. QuickBooks users often run into:
- Duplicate or missing entries that throw off depreciation schedules and tax filing accuracy.
- Inconsistent GL account mapping, which muddies financial reports and complicates audits.
- Manual spreadsheet calculations, which increase error risk and devour staff time.
- Limited visibility into asset details, making it hard to analyze maintenance costs or plan timely replacements.
Using Fixed Asset Manager directly inside QuickBooks eliminates these pain points. The module syncs every purchase, disposal, and depreciation journal entry with the general ledger, ensuring compliance with tax rules, keeping auditors happy, and giving you real-time asset intelligence—all without leaving the platform.
Setting Up Fixed Assets in QuickBooks: Best Practices and Step-by-Step Instructions
Getting your fixed assets into QuickBooks correctly the first time prevents hours of cleanup later. Follow the structured process below to create each asset, map it to the right accounts, and avoid common pitfalls.
Using the Fixed Asset Manager module is far simpler than tracking your assets inside of Excel, because it synchronizes every new asset and modification directly with the general ledger, minimizing manual calculations and errors—especially useful when you’re juggling multiple purchases at once.
Creating Asset Item Lists in QuickBooks
An organized asset item list is your foundation for accurate financial tracking. Start by gathering invoices, purchase price acquisition details, and any loan documentation.
- Open Lists ➜ Fixed Asset Item List, then click Item > New.
- Enter an asset description that is easy to recognize (e.g., “2024 Ram Truck”).
- Choose the fixed asset account where the item will reside on the balance sheet.
- Input the acquisition date and purchase price.
- Add the vendor’s name and any location or serial number details for future reference.
- Save and repeat for each asset.
Tips for Flawless List Creation:
- Align the asset’s GL account to ensure accurate financial reports.
- Use clear categories—vehicles, computer equipment, furniture—to simplify depreciation schedules and reporting.
- Record the full purchase price, even if you financed part of it, so accumulated depreciation remains correct.
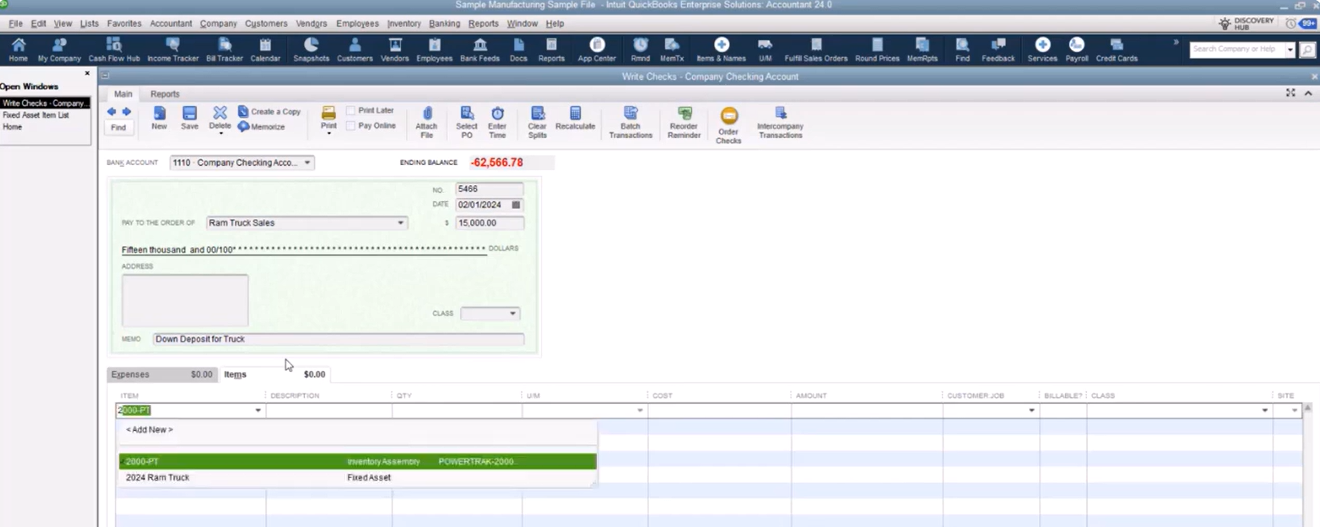
Properly Recording Fixed Asset Purchases
Once an item exists in your asset list, post the purchase to the balance sheet.
- Write a check or enter a bill for the vendor.
- On the expense tab, select the newly created fixed asset item; QuickBooks auto-populates the amount.
- Record any down payment against cash and the remaining balance against a long-term liability (loan) account.
- Attach digital copies of invoices or loan documents to the transaction for audit readiness.
Common Errors—and How to Avoid Them:
- Mixing asset items with expense accounts, which bypasses depreciation schedules entirely.
- Forgetting to set up separate loan sub-accounts, leading to reconciliation headaches.
- Entering only the down payment as the asset’s cost, which understates book value and overstates gain on future disposal.
- Skipping vendor details, making it harder to trace warranty or maintenance obligations.
With assets correctly listed and posted, you’re ready to track depreciation and maintain accurate financial records throughout each asset’s life cycle.
Tracking and Depreciating Fixed Assets Using QuickBooks Fixed Asset Manager
Once your assets are set up, the next priority is maintaining accurate depreciation and book value. Consistent tracking safeguards compliance, ensures financial records stay up-to-date, and provides the insight you need for replacement planning.
- Depreciation spreads an asset’s cost over its useful life, protecting profit-and-loss statements from large one-time hits.
- Accurate accumulated depreciation keeps the balance sheet’s net book value realistic for lenders and investors.
- Automated journal entries reduce manual workload and eliminate risks of off-by-one-month errors.
- Timely updates support tax purposes, ensuring you claim allowable deductions without triggering red flags.
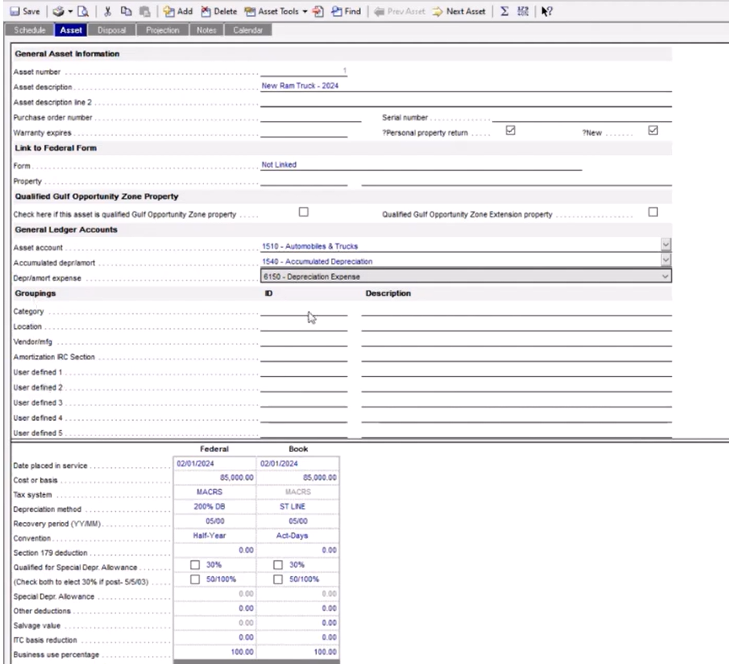
Configuring Depreciation Schedules and Methods
Selecting the right depreciation approach in Fixed Asset Manager is straightforward:
- Open the asset, then choose a tax system (Book, Federal, AMT, or State).
- Pick a depreciation method:
- Straight Line for predictable, even expense recognition.
- 200% or 150% Declining Balance for accelerated write-offs.
- Section 179 or Bonus options when you need immediate deductions.
- Set the useful life (five, seven, or custom years) and select a convention—Half-Year, Mid-Month, or Mid-Quarter—based on IRS rules.
- Review the projected schedule to confirm annual and year-to-date depreciation amounts.
- Map accumulated depreciation and depreciation expense to the correct GL accounts so every monthly post aligns with your balance sheet and income statement.
Best Practice Syncing Tips:
- Verify account numbers match those used during initial asset setup.
- Schedule monthly automated depreciation posts to prevent quarter-end surprises.
- Reconcile accumulated depreciation balances at least once per quarter against Fixed Asset Manager totals.
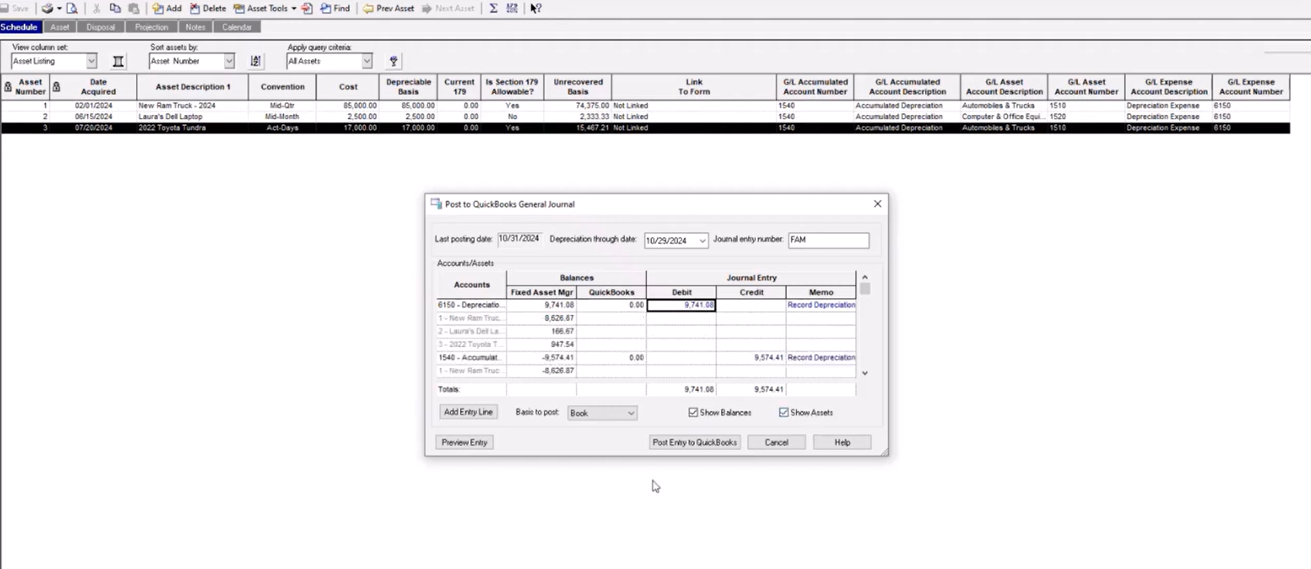
Handling Asset Disposals and Sales in QuickBooks
Eventually, you’ll trade in a truck or sell an outdated server. Recording disposals promptly keeps asset and depreciation schedules clean:
- Open Fixed Asset Manager ➜ Disposals, select the asset, and mark it as sold or retired.
- Enter the sale date and proceeds (if any); the system calculates gain or loss automatically.
- Save and post the disposal entry back to QuickBooks; this moves cost and accumulated depreciation off the books and records any gain/loss.
- Attach sales documents or trade-in agreements for audit support.
Compliance and Reporting Checklist:
- Confirm sales price matches the bill of sale and bank deposit.
- Review state-specific tax rules on personal property returns—some jurisdictions still require reporting disposed assets for the year of sale.
- Maintain disposal notes (reason, buyer, and supporting invoices) for at least seven years in case of audit.
- Run a post-disposal fixed asset schedule to ensure the asset no longer appears in active lists.
With depreciation schedules humming and disposals handled correctly, you can turn your attention to extracting actionable insights from QuickBooks’ built-in fixed asset reports.
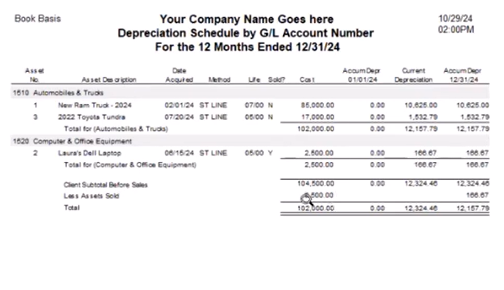
Reporting on Fixed Assets: Generating Accurate Schedules and Strategic Insights
Fixed Asset Manager’s built-in reports turn raw depreciation data into clear schedules you can hand to auditors, bankers, or tax advisors with confidence. Instead of wrestling with spreadsheet pivots, you can generate on-demand summaries that reconcile perfectly with your general ledger, spotlight aging assets, and forecast replacement costs.
Creating and Customizing Fixed Asset Reports
QuickBooks offers several reporting views, and each can be tailored in just a few clicks:
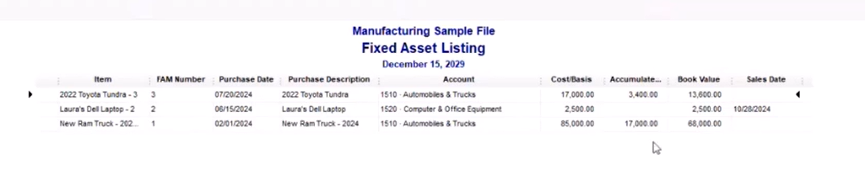
- Depreciation Schedule – Lists cost, accumulated depreciation, and book value for every asset, filtered by category or GL account.
- GL Account Schedule – Groups assets by balance-sheet account to simplify month-end reconciliation.
- Projection Schedule – Extends depreciation out five or more years to support cash-flow planning.
- Disposal Summary – Breaks down gain or loss for each sale or retirement during the year.
- Category or Location Reports – Aggregate assets by department, site, or custom groupings for internal budget reviews.
Leveraging Reports for Tax Filings and Strategic Planning
Well-structured reports aren’t just compliance paperwork; they shape smarter decisions:
- Tax filings
- Provide your CPA with federal-basis schedules to accelerate Form 4562 preparation.
- Flag Section 179 or bonus depreciation elections to confirm they align with current tax strategy.
- Strategic planning
- Use projection schedules to budget for upcoming capital expenditures and avoid cash-flow surprises.
- Identify fully depreciated but operational assets—often low-cost candidates for replacement that can improve efficiency.
- Year-end review
- Compare book and tax depreciation to spot variances that may require adjusting entries.
- Verify disposals are fully removed from schedules to prevent property-tax overstatements.
- Archive finalized reports and roll the file forward so the new fiscal year starts clean.
Our team at Fourlane highlights that reliable fixed asset reports remove guesswork by syncing every purchase, depreciation entry, and disposal back to the general ledger—making monthly closes faster and audit trails airtight.
With these schedules in hand, you’re prepared to close the year smoothly, support tax filings, and build a capital plan that keeps your business assets—and your growth—on track.