

Every year, U.S. businesses collectively lose thousands of productive hours to manual data entry, scattered reports, and cumbersome cleanup tasks. Those minutes spent hunting for the right transaction list, re-keying transactions, or fixing avoidable errors silently pile up into full workdays – and sometimes weeks – that could be devoted to strategic planning or client advisory work instead. By embracing practical QuickBooks Desktop tips that streamline the bookkeeping process, you not only save lots of time, but you also reduce the risk of errors that can derail period closes.
Why these QuickBooks Desktop tricks matter
Here at Fourlane, we know our platform comes equipped with a toolkit purpose-built to reclaim that lost time. From bulk list updates and batch entry of recurring transactions to customizable dashboards and powerful accountant-only utilities, QuickBooks hides a wealth of features that can sharpen accuracy, speed up routine tasks, and mold the interface to match the way you work best. Mastering the ten tricks that follow will help you turn QuickBooks Desktop into a high-efficiency engine for data integrity, password-protected files, and personalized workflows – all without adding new software or plugins.
The result: You can focus on growing the business instead of wrestling with data files.
1. Mastering Add/Edit Multiple List Entries for Bulk Data Updates
Staring down a spreadsheet with hundreds of new items or customer records can feel daunting. Fortunately, QuickBooks Desktop’s built-in bulk updates eliminates the need for line-by-line edits, freeing you to focus on higher-value tasks and making bookkeeping easier day after day. Here are just a few moments when it pays dividends:
- Onboarding dozens of new customers or vendors after an acquisition, especially when you need to set users and access company files quickly
- Refreshing inventory prices before a seasonal sale, ensuring that items list details stay current and profitable
- Deactivating product SKUs that are no longer sold to keep your chart of accounts shortcut list clean
- Correcting typos in item descriptions or customer contact details so that reports QuickBooks generates remain accurate
- Migrating QuickBooks data from a legacy system into your primary company file without duplicate entry
A QuickBooks training session notes that the bulk updates feature mirrors a spreadsheet workflow, letting you paste large data sets directly into QuickBooks and save them all at once – a process that can save lots of time and eliminate unnecessary clicks.
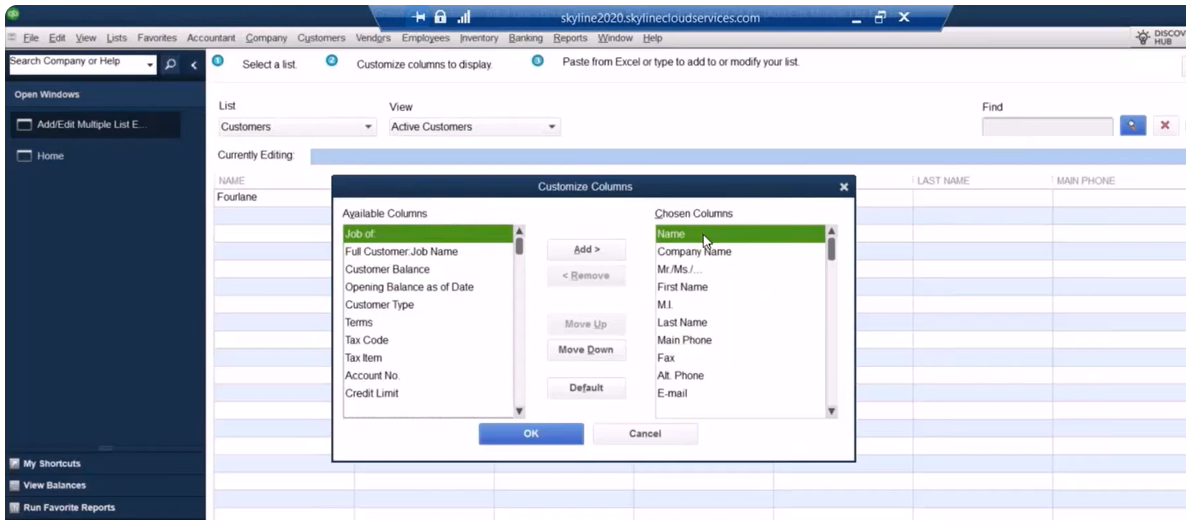
To reach this powerhouse tool, open QuickBooks Desktop and navigate to Lists > Add/Edit Multiple List Entries on the menu bar. A drop-down menu lets you choose exactly which list you want to update – customers, vendors, or any item type, including service, inventory, non-inventory, or assembly parts. Once selected, you’ll see a grid resembling Excel, complete with column headers you can rearrange, add, or remove to match your source spreadsheet.
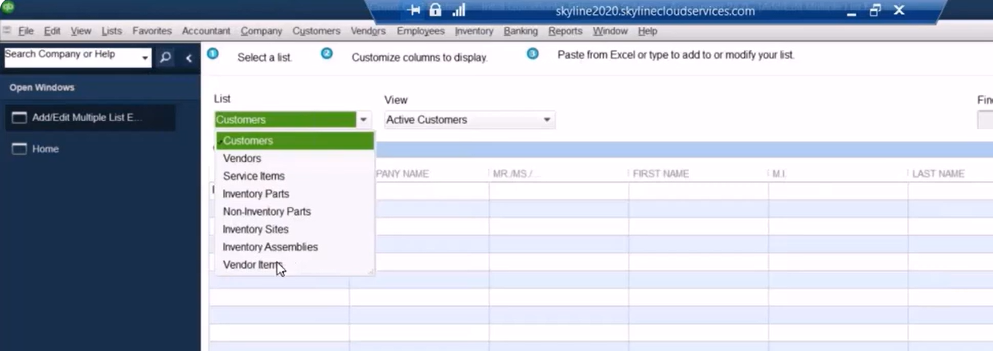
Next, leverage simple copy-and-paste. Set your external spreadsheet to the same alpha-numeric sort order QuickBooks uses (usually ascending by name or item number) to avoid mismatches. Then highlight the rows you need, paste them into the grid, and click Save Changes. QuickBooks validates each entry: if a vendor or account doesn’t yet exist, the row turns red so you can fix it before posting the entire batch – a safeguard that minimizes data errors and rework, according to a training walkthrough that highlights the value of configuring customized columns for clean imports.
Mastering this single feature can reduce repetitive keystrokes, eliminate copy errors, and establish a repeatable process for mass updates. With lists in shape, you’re ready to accelerate the next phase of bookkeeping – high-volume transaction entry that keeps income and expenses on track.
2. Speeding Up Entry with Batch Transactions: Checks, Deposits, and More
- Checks issued in a weekly payment run, mapped to the correct bank accounts and accounts payable ledger
- Bank deposits recorded at day’s end to keep cash flow forecasts and reconciling accounts accurate
- Credit card accounts with charges or credits imported from merchant statements
- Vendor bills and bill credits received in bulk so you can reconcile accounts with ease
- Customer invoices generated outside QuickBooks (for example, from an e-commerce platform) that need to appear in the invoices print window
- Credit memos issued after returns or pricing adjustments
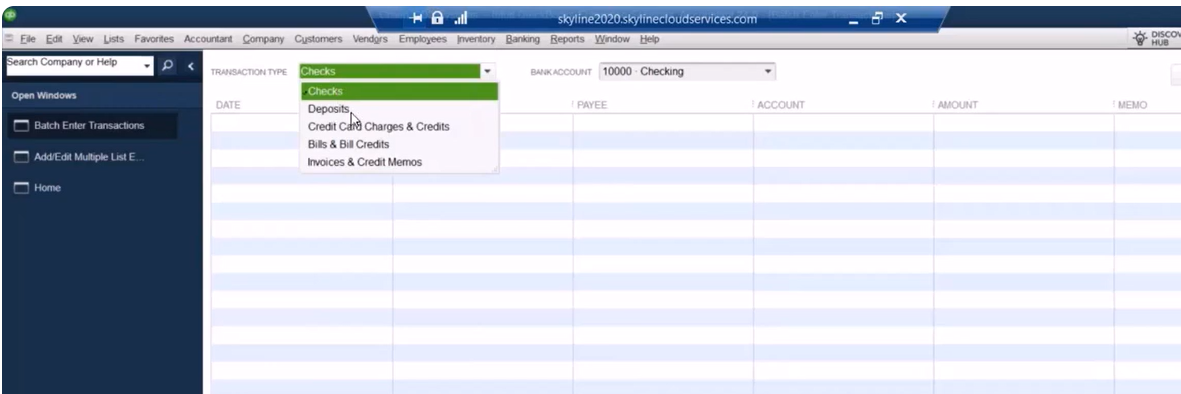
To launch high-volume entry, open Accountant > Accounting Tools (or Company > Accounting Tools if you’re not in the Accountant edition) and choose Batch Enter Transactions. From the Transaction Type drop-down you can select checks, deposits, credit-card charges or credits, bills, bill credits, invoices, or credit memos. Next, pick the bank, credit-card, or A/P or A/R account that the transactions will post to. The grid that appears mimics a spreadsheet: use Customize Columns to add, remove, or reorder fields so they match the layout of your source file.
Copy the rows from Excel or a CSV export and paste them directly into the grid. Each line is validated automatically – QuickBooks flags missing vendors, customers, or chart-of-account names in red so you can correct them before you click Save Transactions. This safeguards data integrity while still letting you enter hundreds of transactions in minutes, thanks to the platform’s batch enter transactions screen, which replicates familiar spreadsheet workflows and cuts down on repetitive keystrokes.
For even faster processing, download bank or credit-card activity as a spreadsheet, map the columns to match your customized grid, and paste. Pair this with consistent vendor and account naming conventions to avoid validation errors, and you’ll have a near-automated pipeline from statement download to posted entry. These time-saving tips also make closing QuickBooks windows at the end of the day less daunting.
Batch entry scales effortlessly as your transaction counts grow, ensuring you aren’t held back by manual processes. Next, let’s look at how to keep your file squeaky clean when those large imports need a second pass.
3. Cleaning Up Data with Batch Delete and Void Transactions
Even the most vigilant accounting teams occasionally import duplicate entries or discover stale transactions clogging up their books. When that happens, the Batch Delete/Void feature turns hours of cleanup into a quick, guided task that reduces risk errors and keeps reports QuickBooks produces consistent. Before diving in, consider the most common situations that call for a mass purge or reversal:
- A bank feed was imported twice, spawning duplicate checks and deposits and cluttering the transaction list QuickBooks displays
- Bulk invoices were posted to the wrong date or customer, creating lots of time dates discrepancies
- Test entries from a system migration remain in the live file
- Vendor bills were uploaded with incorrect amounts or GL accounts, making reconciling accounts tedious
- Legacy transactions need removal before a period-close adjustment or before closing QuickBooks for the month
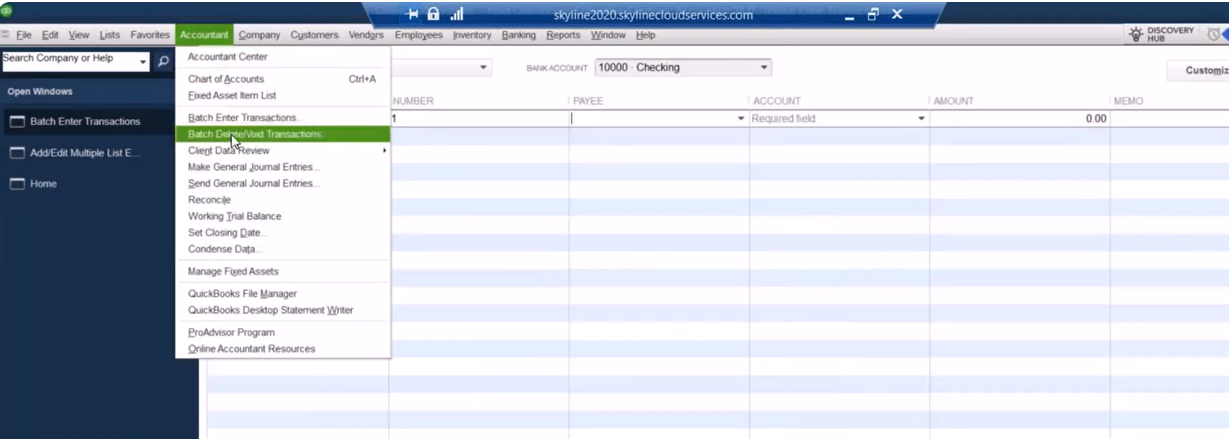
To start, open Accounting Tools and select Batch Delete/Void Transactions. A familiar grid appears:
- Choose the transaction type you need to correct – checks, deposits, bills, invoices, credit-card charges, or other entries.
- Apply filters by entered date, last-modified date, or the original transaction date to zero in on the problematic period.
- Tick “Show linked transactions” to understand ripple effects, such as sales orders tied to invoices.
- Review each line item – the grid lets you sort, search, and drill into details before taking action.
Select “Review & Void” or “Review & Delete,” confirm your choices, and post the changes in one sweep. This process follows the same grid-style interface used for batch entry, so the learning curve is minimal.
Because deletion is permanent, proceed with caution. We emphasize reviewing every flagged record individually, especially when links exist between transactions. Once you confirm a batch delete or void, QuickBooks can’t roll it back automatically – you would need to recreate or re-enter the data to undo the action. A dependable safeguard is to create a full company backup before running any large-scale cleanup, then document which transactions were removed for audit transparency.
With redundant or erroneous entries cleared, your reports become more trustworthy and your file remains lean. This solid foundation sets the stage for proactive monitoring – starting with real-time customer insights in QuickBooks Desktop’s Income Tracker.
4. Tracking Income with Customer Snapshot Tools
QuickBooks Desktop’s Income Tracker condenses multiple reports into a single dashboard, giving you an at-a-glance view of:
- Unbilled time and expenses waiting to be invoiced, ensuring you track income expenses accurately
- Open invoices that still need payment, helping you maintain positive cash flow
- Past-due invoices requiring follow-up to keep aging feature snapshot data current
- Payments received in the last 30 days to make reconciling accounts simpler
To zero in on specific details, open Customers > Income Tracker. Use the tabs along the top to toggle between each category, then filter further by customer, date range, or status. Select any line (or Shift-click to highlight several) and choose batch actions such as emailing all selected invoices, printing them, or marking estimates as closed when work is complete – functionality explained in a QuickBooks training webinar.
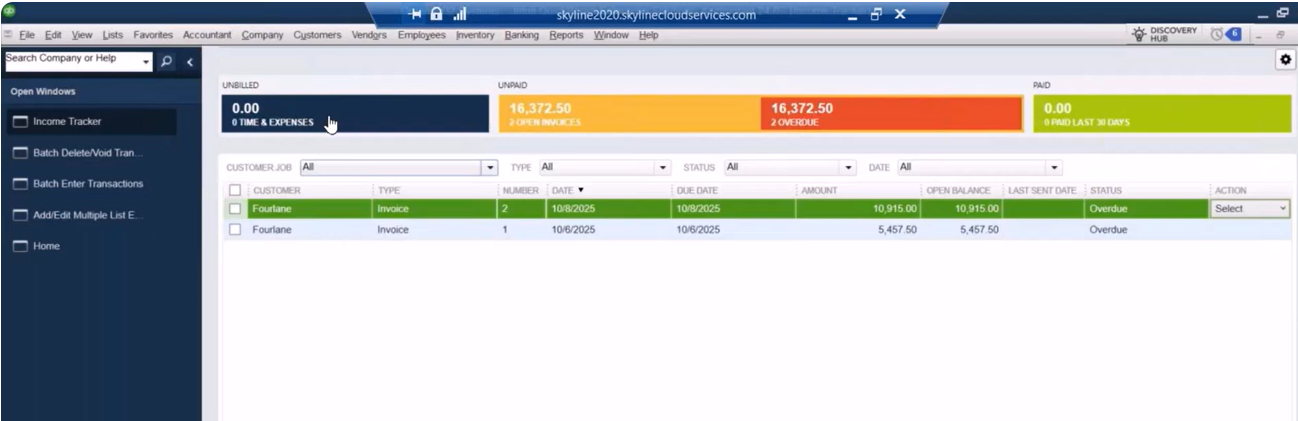
Please note that multicurrency files cannot use Income Tracker because real-time exchange calculations would slow performance. If you manage international customers, rely on Customer Center aging reports instead. For U.S.-dollar books, however, Income Tracker excels at spotlighting stalled estimates, missed billing opportunities, and slow-pay accounts so you can act before month-end. Pair those insights with automated reminders or bundled email sends, and you’ll see cash flow improve without adding manual workload.
Armed with sharper customer insights, the next logical step is mirroring that efficiency on the vendor side. QuickBooks Desktop’s Bill Tracker brings the same clarity to payables, ensuring a balanced, end-to-end view of your company’s financial pulse.
5. Managing Vendor Balances with Bill Tracker
When payables start stacking up, Bill Tracker steps in as your mission control for vendor obligations. At a glance, you can:
- View every open bill waiting for approval or payment, making accounts payable management effortless
- Monitor purchase orders that still need conversion to bills
- Spot overdue amounts before late fees hit, keeping report accurate for month-end close
- Confirm which bills, credits, or payments have cleared within the last 30 days, which is essential when reconciling credit card accounts or bank accounts
To put Bill Tracker to work, head to Vendors > Bill Tracker and follow these steps:
- Choose the appropriate tabs – Open Bills, Purchase Orders, Overdue, or Paid.
- Filter by vendor, status, or date range to narrow results.
- Click any column header to sort by due date, balance, or vendor name for quick prioritization.
- Select one or multiple transactions and use the Action drop-down to pay bills, print checks, or close purchase orders in bulk.
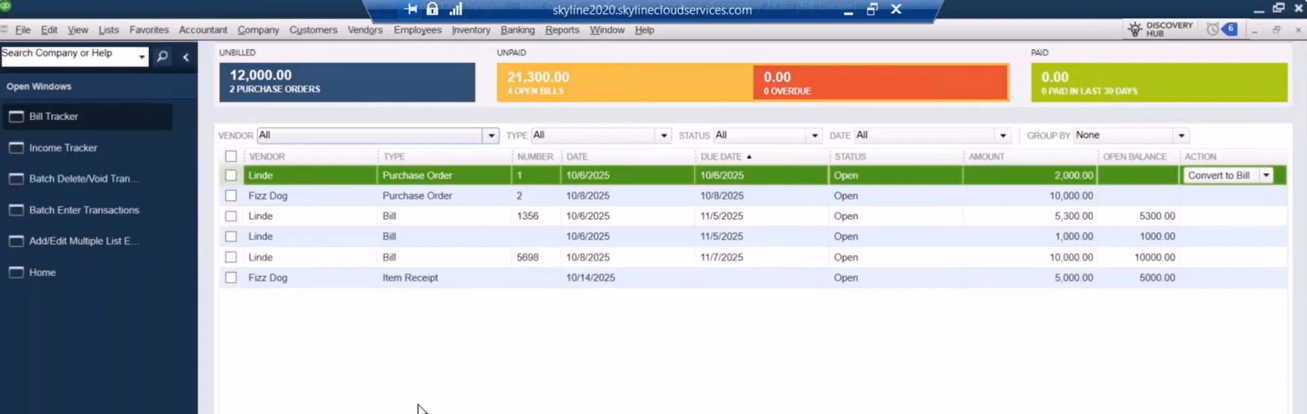
Refresh the dashboard after each batch action to verify that totals update and no lingering items remain.
Because the tool aggregates key payables data in one place, it doubles as a rapid vendor-aging report. Sort by due date or status to pinpoint suppliers that need attention, then drill directly into the bill to schedule payment or resolve discrepancies. This approach eliminates the need to run separate aging or open-balance reports, helping you maintain strong vendor relationships and avoid late-payment penalties.
With customer inflows and vendor outflows now crystal clear, it’s time to explore how fine-tuning QuickBooks’ settings can personalize the platform for every user – and shave off even more minutes from daily routines.
6. Personalizing QuickBooks with Company and User Preferences
Before you invest in add-ons or create elaborate workarounds, remember that many everyday frustrations disappear once QuickBooks Desktop is tuned to match your unique workflow. Leveraging these settings is one of the simplest QuickBooks Desktop tips, yet many users overlook them.
- Accounting: enable automatic decimal placement, control how journal-entry memos populate, and set closing date warnings to protect prior-period data
- Checking: designate default bank accounts for writing checks, paying bills, or making deposits to avoid misposts
- General: pick Tab or Enter for field navigation, toggle confirmation beeps, decide how date fields behave, and use keyboard shortcuts to expedite data entry
- Sales & Customers: turn on price levels or default email templates for invoices and statements, and specify default invoices print settings
- Payroll & Employees: set preferences for paycheck printing, tax form printing, and time tracking so you can track income expenses accurately
- Integrated Applications: manage which third-party tools can access your company file, a best practice when sharing QuickBooks data across departments
Open Edit > Preferences to reveal two tabs on the left for every module: My Preferences and Company Preferences. My Preferences affect only your login, allowing you to tailor navigation keys, color schemes, or report formatting without impacting colleagues. Company Preferences apply file-wide, so changes to posting accounts, auto-reminders, or default payment terms should be coordinated team-wide to maintain consistency across departments.

We emphasize that every settings area offers both user-specific and company-wide controls, making it easy to fine-tune QuickBooks without stepping on a teammate’s toes. Autocomplete memos, set your most-used bank account as the default, and opt for single-keystroke navigation – small adjustments that compound into minutes saved on each transaction.
When your environment feels tailor-made, you’ll naturally move faster and make fewer errors, whether you’re recording barter exchanges or reconciling credit card accounts. Next, we’ll build on that momentum by customizing the toolbar and navigation layout to keep your most-used tools just a click away.
7. Customizing the Toolbar and Navigation for Maximum Efficiency
A few minutes of interface tweaks can translate into hours of saved time every month. QuickBooks Desktop’s navigation tools are surprisingly flexible, letting you surface the buttons and views you use most while hiding the ones you rarely touch. Here are the core areas you can adjust:
- Open Window List for instant visibility into every screen you have running, so closing QuickBooks windows individually becomes easier
- Icon bar position (left side or top) to match widescreen or traditional monitor setups
- Shortcut buttons you can add, remove, or reorder for quick access to frequently used tasks like Receive Payments, Write Checks, or Memorized Reports
- View modes that switch between classic drop-down menus and a more visual icon layout
To tailor the workspace, start by opening the View menu. Select either Left Icon Bar or Top Icon Bar to reposition shortcuts in a single click. Next, choose Customize Icon Bar, where you can:
- Check or uncheck boxes to show or hide existing shortcuts
- Use the Move Up or Move Down buttons to reorder icons so your daily essentials sit front and center
- Click Add to create brand-new buttons; you can label them, assign colors, and even link directly to a memorized report, external website, or specific list window
- Remove clutter by highlighting any icon you never use and selecting Delete
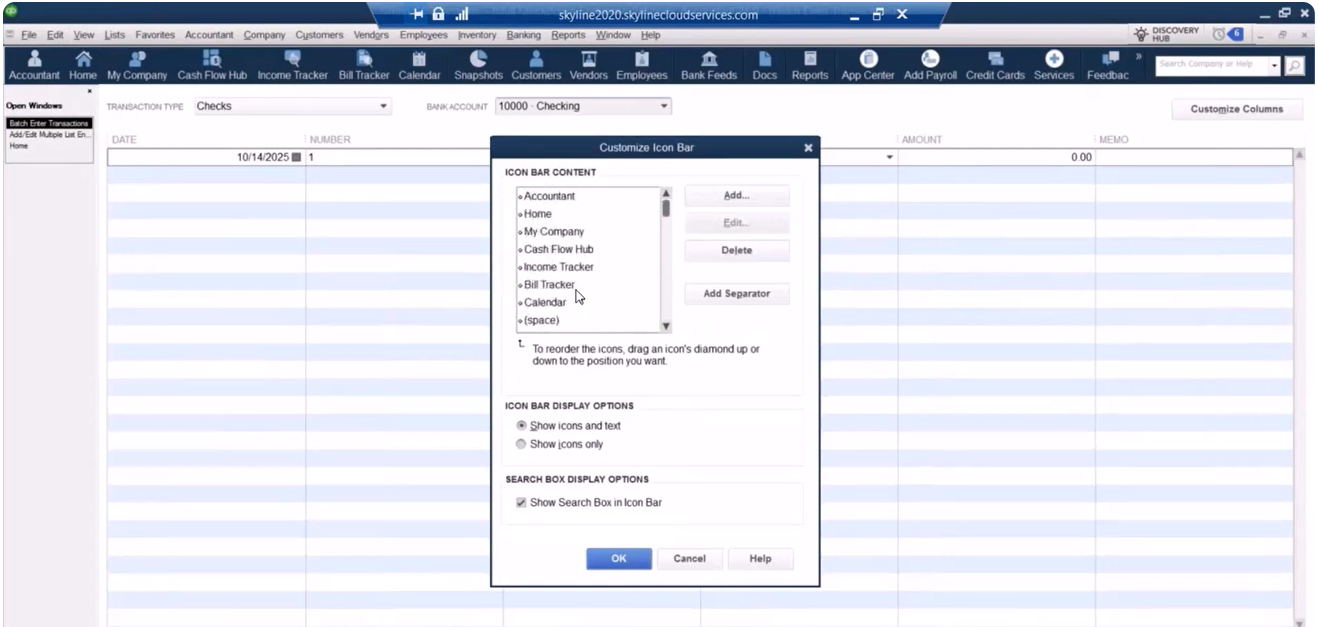
Power users also enable the Open Window List (View > Open Window List). This narrow pane displays every active window in real time, making it effortless to jump between a customer record, an invoice, and a report without losing your place. Need to tidy up? Right-click a window in the list and choose Close to clear it from view or select Close All to reset your workspace for the next task.
Once your navigation flows as naturally as your thought process, you’ll spend less time hunting for screens and more time driving insights. Speaking of insights, let’s look at how to capture and reuse your favorite reports so vital information is always just a click away.
8. Saving Time with Memorized Reports
Recurring reporting cycles shouldn’t feel like déjà vu. By turning one-off customizations into templates, you can run polished, presentation-ready statements in seconds instead of rebuilding filters from scratch. Memorized reports also keep the company menu tidy by grouping related analytics:
- Monthly profit and loss statements with department filters
- Customer or vendor aging summaries sent to management each Friday
- Job-cost reports filtered by class or location for project managers
- Cash-flow forecasts that update with the latest bills and open invoices, keeping report accurate for key stakeholders
Start with any report – say, Profit & Loss. Apply your usual date range, filters, and column tweaks, then click Memorize at the top of the window. Give the template a clear, action-oriented name such as “P&L – Marketing Dept – Month End” and choose whether to store it in an existing Memorized Report Group or create a new one (for example, “Month-End Package”). QuickBooks then adds the layout to Reports > Memorized Reports, where it’s just one click away for you or anyone you’ve shared the template with.
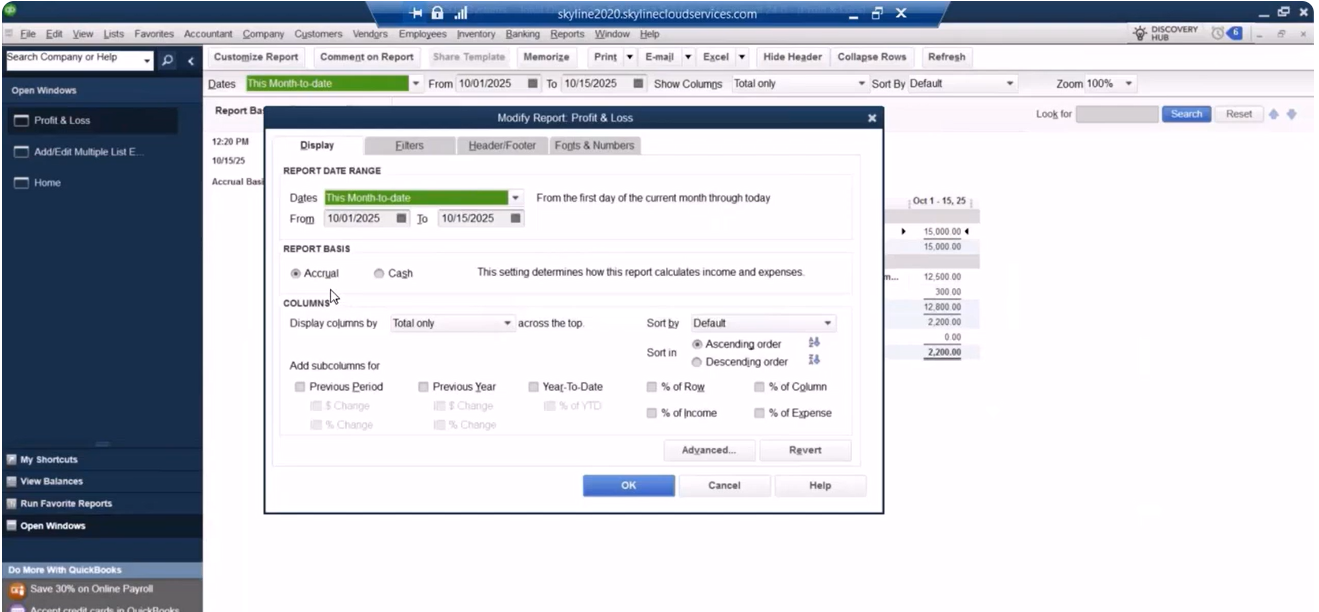
A QuickBooks training session explains that memorized reports capture every customization – columns, sort order, filters, and headers – allowing teams to re-run complex analytics without risking omissions or formula errors. As a bonus, QuickBooks reminds you to save changes the moment you close a modified report, ensuring valuable tweaks aren’t lost.
For power users, maintain tidy groups and naming conventions. Prefix templates with the reporting cycle (“Daily – Cash Position,” “Quarterly – Board Packet”) so colleagues can instantly find the right file. You can even schedule memorized reports to batch print or email on a set cadence, virtually eliminating last-minute scrambling before executive meetings. Combine this with keyboard shortcuts for opening the reports list, and you’ll shave seconds off every lookup.
With reporting on autopilot, you’re free to focus on deeper strategic adjustments. Next up: an under-the-radar toolkit that lets accountants reclassify transactions and correct entire ledgers in minutes.
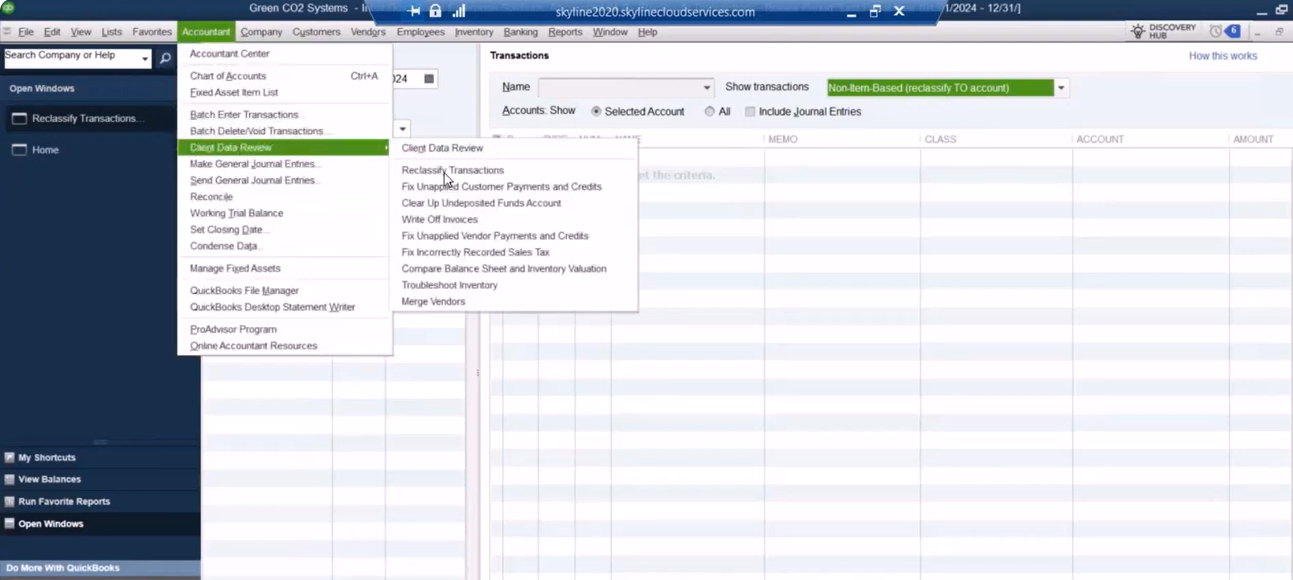
9. Leveraging the Accountant’s Toolbox for Mass Account Changes
When a chart of accounts evolves or client books need a swift tune-up, the Accountant’s Toolbox is your shortcut to large-scale corrections. Here’s what’s inside this powerhouse suite:
- Client Data Review for quick diagnostics of common file issues, including aging feature snapshot discrepancies
- Reclassify Transactions to move entries between accounts, items, or classes in bulk, keeping the QuickBooks file consistent
- Account mapping tools for adjusting entire segments of the chart of accounts without touching individual transactions – ideal when you must set accounts contractors or merge overhead categories
To overhaul misclassified activity with Reclassify Transactions, follow these steps:
- Open Accountant > Client Data Review > Reclassify Transactions.
- Choose whether you want to view transactions “By Account” or “By Item” to match your cleanup goal.
- Apply date-range filters, then narrow further by class, account type, or transaction type to isolate the exact population you plan to move.
- Select the entries you wish to reclassify in the left pane, confirm their current account or class in the right pane, then pick the new destination account or class from the drop-down.
- Click Reclassify. QuickBooks applies the change to every selected transaction in one pass, trimming what could have been hours of manual edits down to seconds.
For deeper file maintenance, use Client Data Review to scan for open credits that haven’t been applied, spot negative expense accounts, or highlight balance-sheet anomalies. Combine these diagnostics with mass reclassification, and you can repair profit-and-loss statements, fix sales-tax misposts, or update departmental class tracking well before financial statements go out the door. Always document the before-and-after impact on totals so auditors – and your future self – can trace the reasoning behind large reclassifications.
With your accounts and classes freshly aligned, you’re ready to tackle one of the most stubborn data issues in any inventory-heavy file: spotting and correcting negative quantity errors before they wreak havoc on margins and balance-sheet accuracy.
10. Troubleshooting Inventory with Negative Quantity Alerts
Negative on-hand balances signal bigger issues than a simple stock miscount. They distort cost of goods sold and inflate margins. Watch for these common red flags:
- Sales orders fulfilled before items were received into inventory, creating negative quantity spikes in items list views
- Accidental duplicate invoices that double-count outflows, requiring extra work during closing QuickBooks periods
- Item receipts deleted or dated after related invoices, producing mismatched transactions QuickBooks struggles to reconcile
- Manual quantity adjustments entered in the wrong direction, affecting income expenses reports
- Assembly builds processed without enough components on hand, making it hard to reconcile accounts
To pinpoint and repair these problems, head to Accountant > Client Data Review > Troubleshoot Inventory:
- Deselect every filter except Negative Quantity.
- Enter a broad date range – start with your fiscal year, then expand if needed.
- Choose “Alert if negative inventory at any point in time” to catch items that dipped below zero even briefly.
- Review the resulting list, drill into each offending transaction, and adjust dates, quantities, or receipts to bring balances back above water.
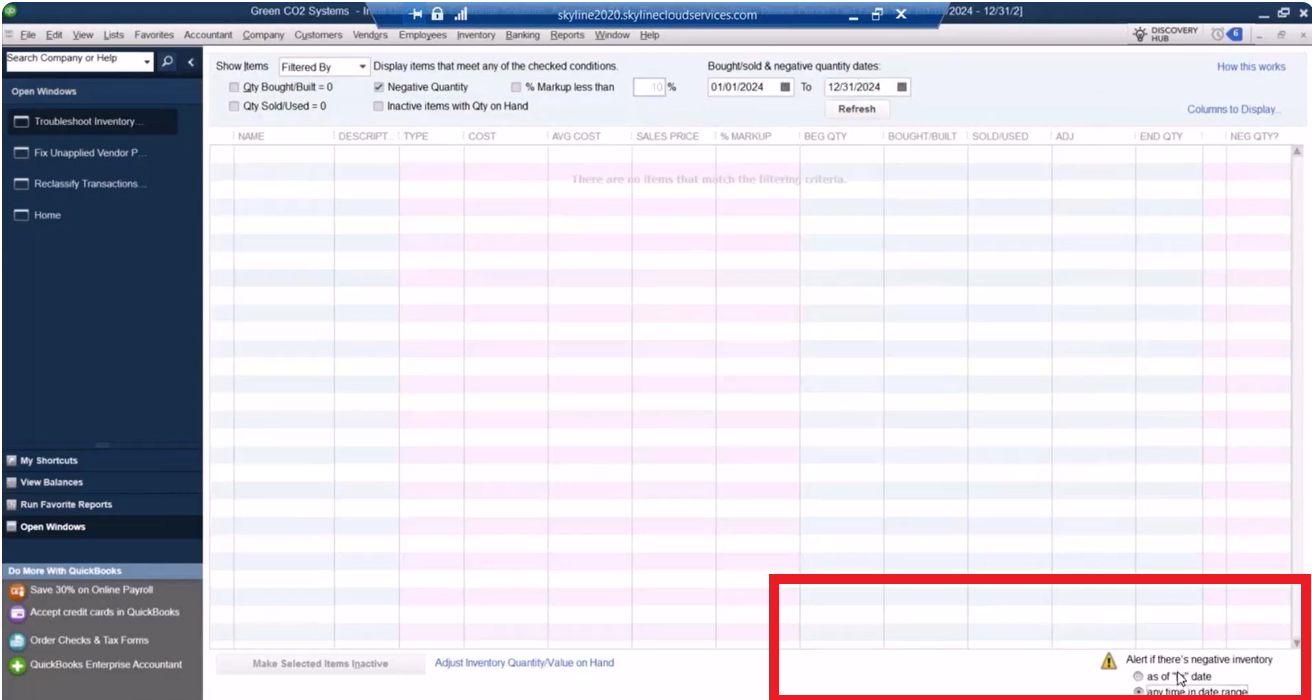
Rebuild assemblies or re-enter item receipts as necessary, then rerun the filter to confirm all negatives are cleared.
For ongoing vigilance, schedule a monthly inventory check: save the filter settings as a memorized report called “Negative Quantity Watchlist” and add it to your month-end group. Combine this with clear receiving procedures – always date item receipts before related invoices – and you’ll spot discrepancies early, keeping margins and stock levels accurate.
With inventory reconciled and every other corner of your file humming, you’ve unlocked the true potential of QuickBooks Desktop. One final recap will tie together these ten high-impact tactics and point you toward next steps for continuous improvement.
Watch a replay of the webinar to see these hidden tips and tricks in action!
Unlocking Your Full QuickBooks Potential
These ten tricks empower accountants and financial managers to save hours, track income with precision, and achieve more accurate, actionable results in QuickBooks Desktop. Contact our team at Fourlane for a personalized consultation, explore additional tips QuickBooks users love on our website, and keep this guide handy whenever you need fresh QuickBooks Desktop tips to streamline bookkeeping processes even further.